Understanding Background Job in Rails with Sidekiq
Understanding Background Jobs in Rails with Sidekiq
Why Background jobs
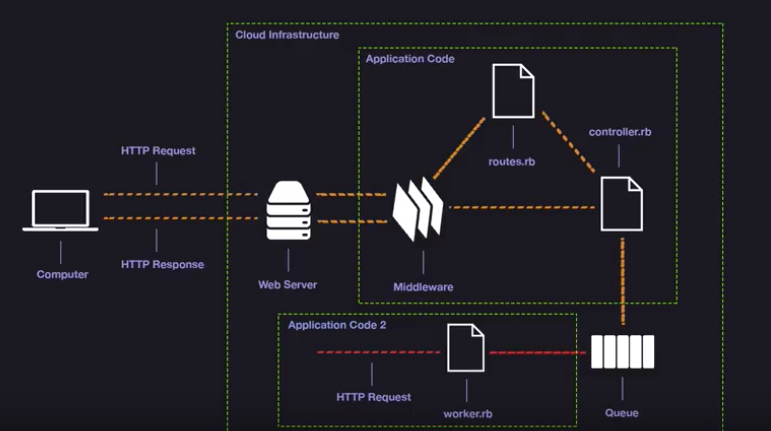
We have Rails taking request and return response, why do we need background jobs. It’s because if we only let rails app server handles all requests, some requests will take much longer time to process, such as sending out bulk emails, reading or exporting large dataset, those requests will block the other requests and cause timeout. But if we use background/asynchronous jobs, we can put those time consuming jobs in a todo list and continue to handle other requests, and those jobs in the todo list will be processed later.

The screenshot is from a better explain the benefit of using background job framework.
Background Job Frameworks
Rails itself has Active Jobs, it has basic functionalities such as save a job, execute a job etc, but to enqueuing and executing jobs in production we will need to set up a 3rd party framework like Sidekiq:
For enqueuing and executing jobs in production you need to set up a queuing backend, that is to say you need to decide for a 3rd-party queuing library that Rails should use. Rails itself only provides an in-process queuing system, which only keeps the jobs in RAM. If the process crashes or the machine is reset, then all outstanding jobs are lost with the default async backend. This may be fine for smaller apps or non-critical jobs, but most production apps will need to pick a persistent backend.
There are a few similar frameworks, they have their own pros and cons, which one is the best depends on the situation, but Sidekiq is widely used in rails apps so I’ll use it here as the example:
Set Up Sidekiq
Sidekiq has nice documentations here, there are only a few steps to get it up and running, but I want to add more details and explanations for people who are new to this.
gem 'sidekiq'
rails g sidekiq:worker Hard # will create app/workers/hard_worker.rb

# In hard_worder.rb
class HardWorker
  include Sidekiq::Worker
  def perform(name, count) # instance method
    # execute something here such as send emails, cleanup things
		# this happens when a job in the queue is taken out the queue,
    # getting processed
		puts "test worker log"
  end
end
How to enqueue a job:
HardWorker.perform_async('bob', 5)You can put it in controller etc, for example I can quickly generate a resources: users and add the above line in the GET request controller, then you can start the server with rails s and request localhost:3000/users. Every time the above line gets executed, a job is added to the queue.
Save Jobs in Redis
Sidekiq uses Redis to save the job queue, we can use brew to install and start redis:
brew install redis
brew services start redis
By default, Sidekiq tries to connect to Redis at localhost:6379, to make it work on production see docs here.
Sidekiq Web UI
To see the job statue, we can use a web UI comes with sidekiq by adding this in config/routes.rb:
require 'sidekiq/web'
mount Sidekiq::Web => '/sidekiq'
Now go to localhost:3000/sidekiq to monitor the jobs, you should see something like this:


You should see a number greater than zero in the enqueued tab, no job has been processed yet, now let’s process these jobs by running: bundle exec sidekiq
You should see jobs have been processed and the test worker log message in the output.
Network Structure
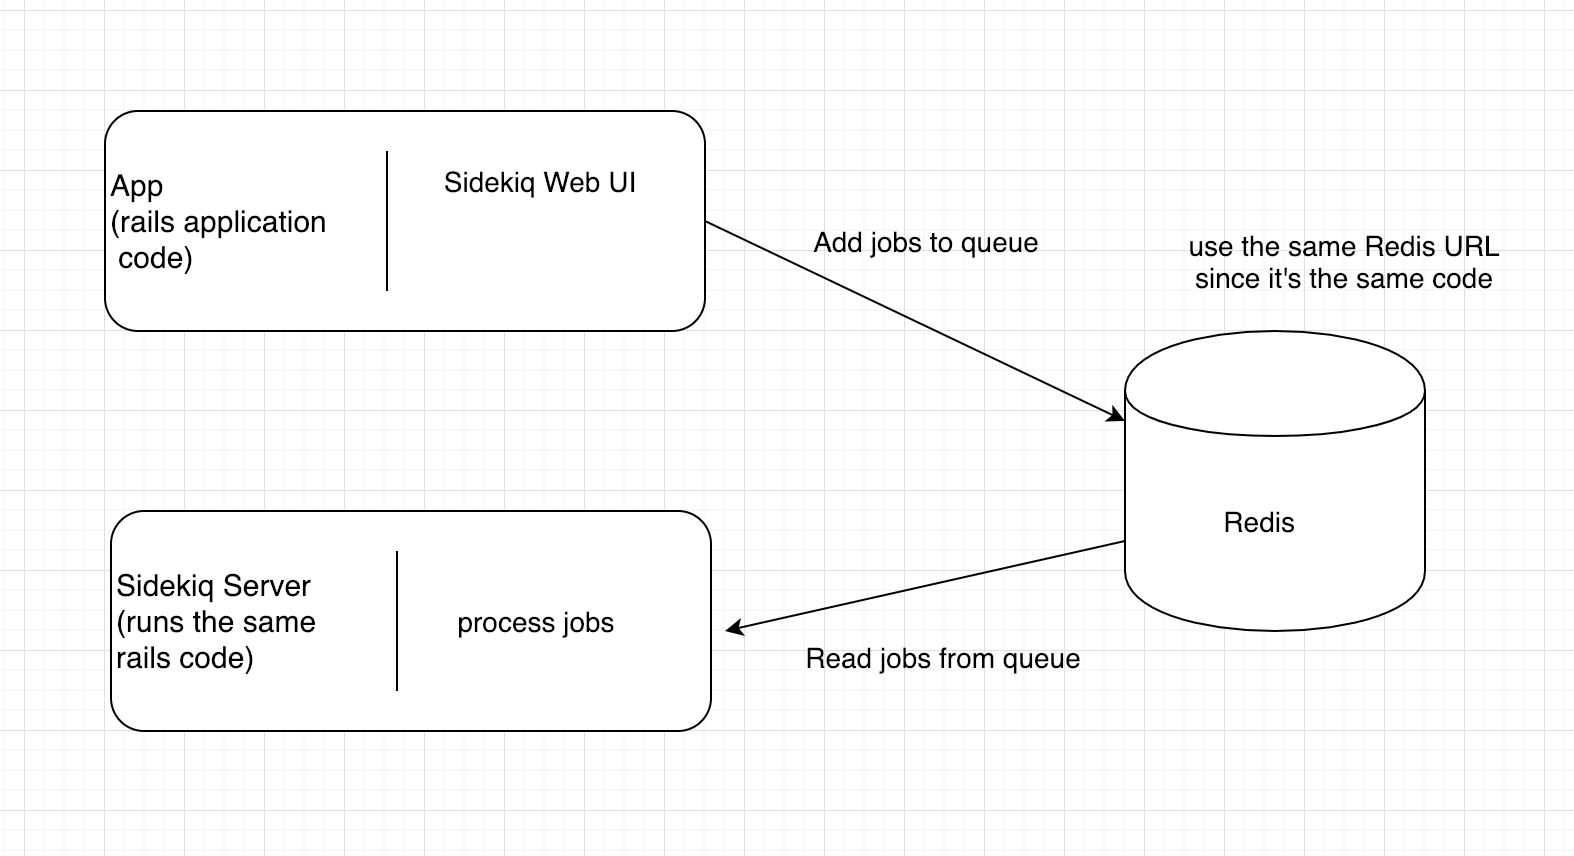
As you see in the screenshot earlier, we could have another sidekiq server, that way, the app server doesn’t need share resources with job framework:

If you read the redis options doc here, there is a sidekiq server and sidekiq client, they are configured independently, The server is responsible for popping jobs off the queue(s) and executing them. The client is responsible for adding jobs to the queue. which matches the diagram above. There is another diagram here.
Other Thing that Are Good to Know
- You can set up more than one queue to process jobs with different priorities with advanced options;
- you can also use sidekiq to create scheduled jobs in a cron way;
- you can also run 1 or more Sidekiqs per app, but note that if you have more than 1 Sidekiq worker server, you cannot guarantee the sequence of job execution.
- To get the sidekiq worker running, you can also run service with systemd, such as this
sidekiq.servicefile here. - There is an article here and here lists some good suggestions, such as don’t place logic in your worker.
- On production, you don’t want everyone to see the monitor web ui, you can add constraints in
config/routes.rb:
authenticate :user do
  mount Sidekiq::Web => '/sidekiq'
end